
My Fleet seamlessly stores and manages information of a transporter’s trucks, trailers, and drivers all in one safe and consolidated view. As a transport owner, you and your fleet management operators will no longer need to open multiple tools, documents or folders to preview key feet information. With My Fleet, you will also receive real-time alerts that notify you of any document, permit or fee expiration; saving you time, money and reducing compliance headaches.
TABLE OF CONTENTS:
- 1. Driver Identification
- 2. Contact Details
- 3. Addresses
- 4. Employment Details
- 5. Other Driver Details
- 6. Banking Details
- 7. Driving License
- 8. Medical Certificate
- 9. Passport
- 10. Work Permit
- 11. RSA Traffic Register
- 12. International Driving Permit
- 13. Defensive Driving Certificate
- 14. Training
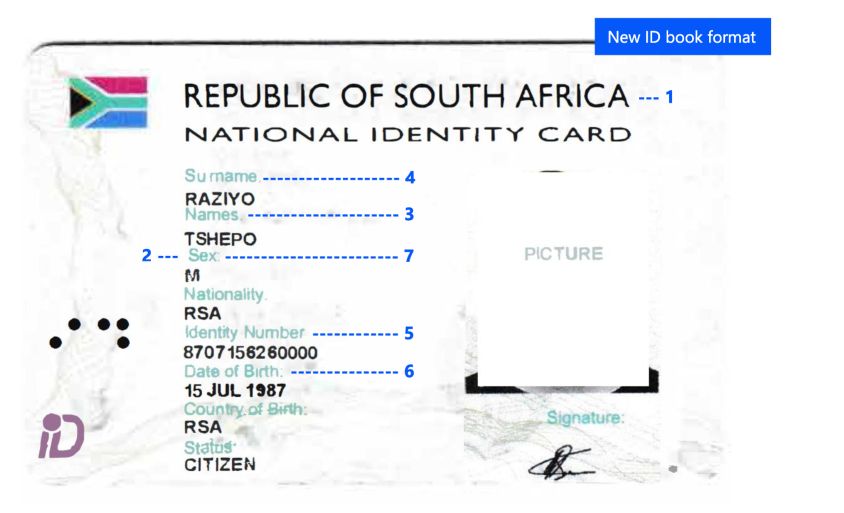
1. Driver Identification
Step 1:Login to your account, and make sure you have your driver’s identification details ready.
Step 2:On the left blue column, Click “My Fleet”.
Step 3:On the top right corner, Click “Add Asset”
Step 5:Click “Driver”
Step 6:In the form, Click a tab named “Driver Identification”.
Step 7: Follow the steps highlighted in the screenshots [Figure 1, Figure 2 and Figure 3] to add the required information
Step 8: Click Save
Step 9: Now you will see a list of the information added in the alerts/notification dashboard
FIGURE 1:
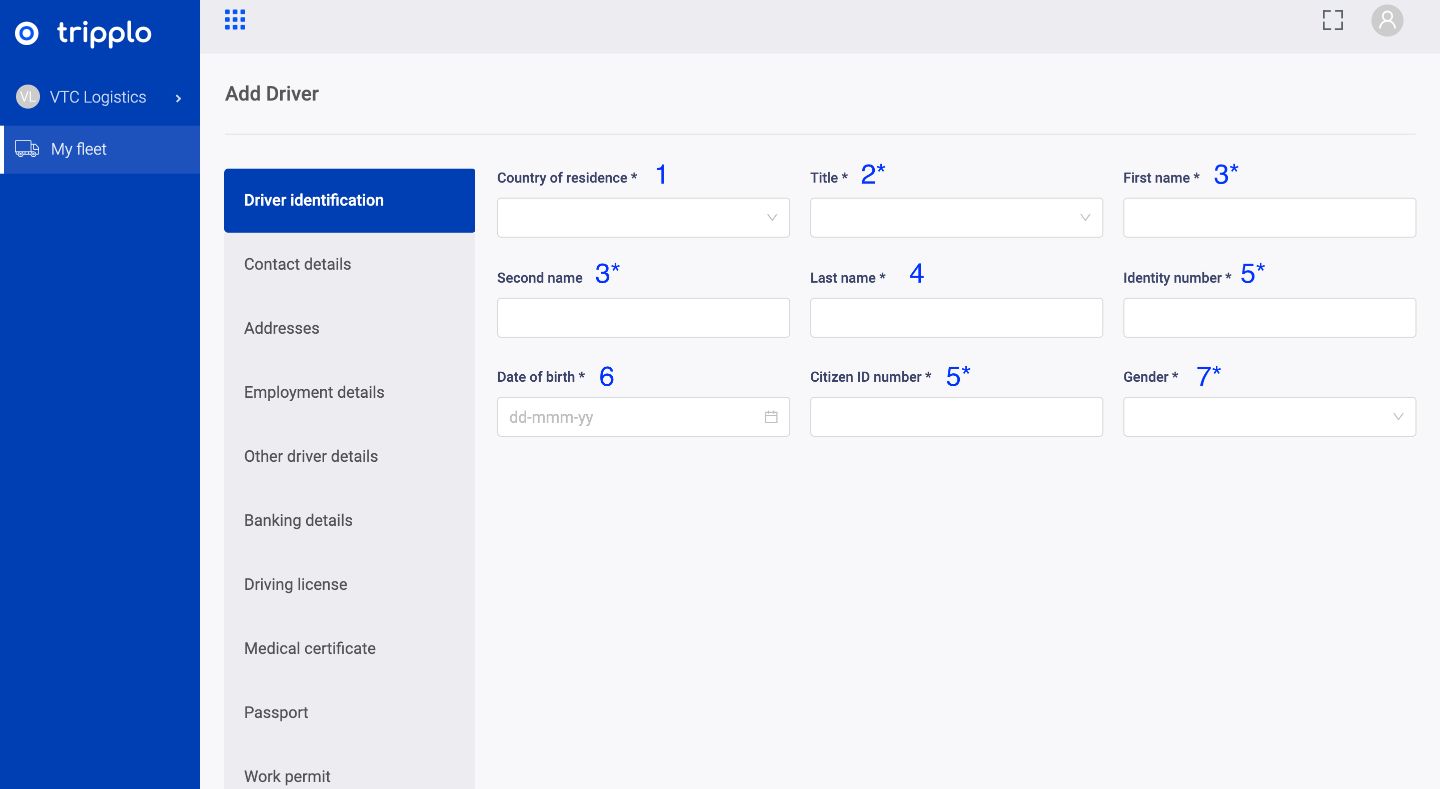
FIGURE 2:
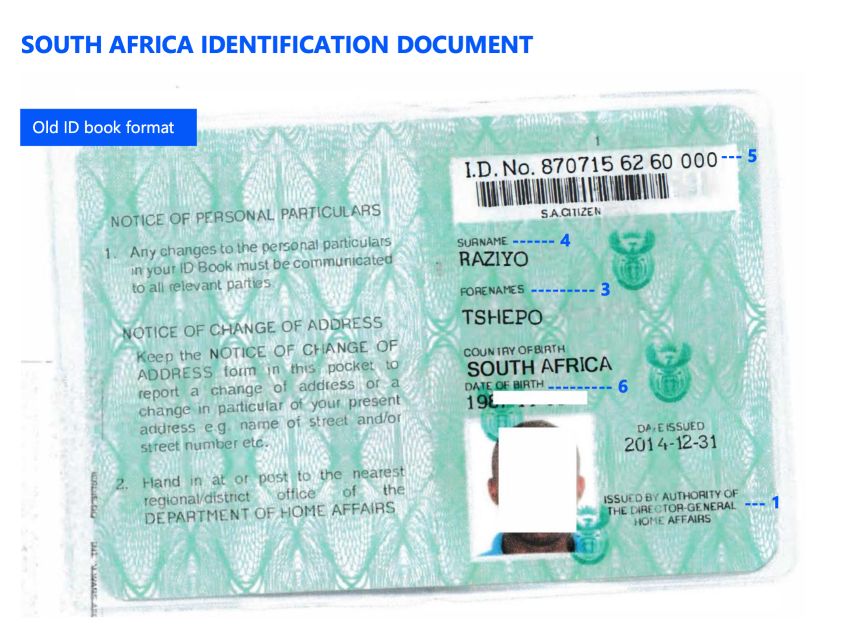
FIGURE 3:
2. Contact Details
Step 1: On the top right corner, click edit
Step 2: In left panel on the form, click a tab named “Contact Details”.
Step 2: Follow the steps highlighted in the screenshots [Figure 4 and Figure 5] to add the required information
Step 4: Click Save
Step 5: Now you will see a list of the information added in the alerts/notification dashboard
FIGURE 4:
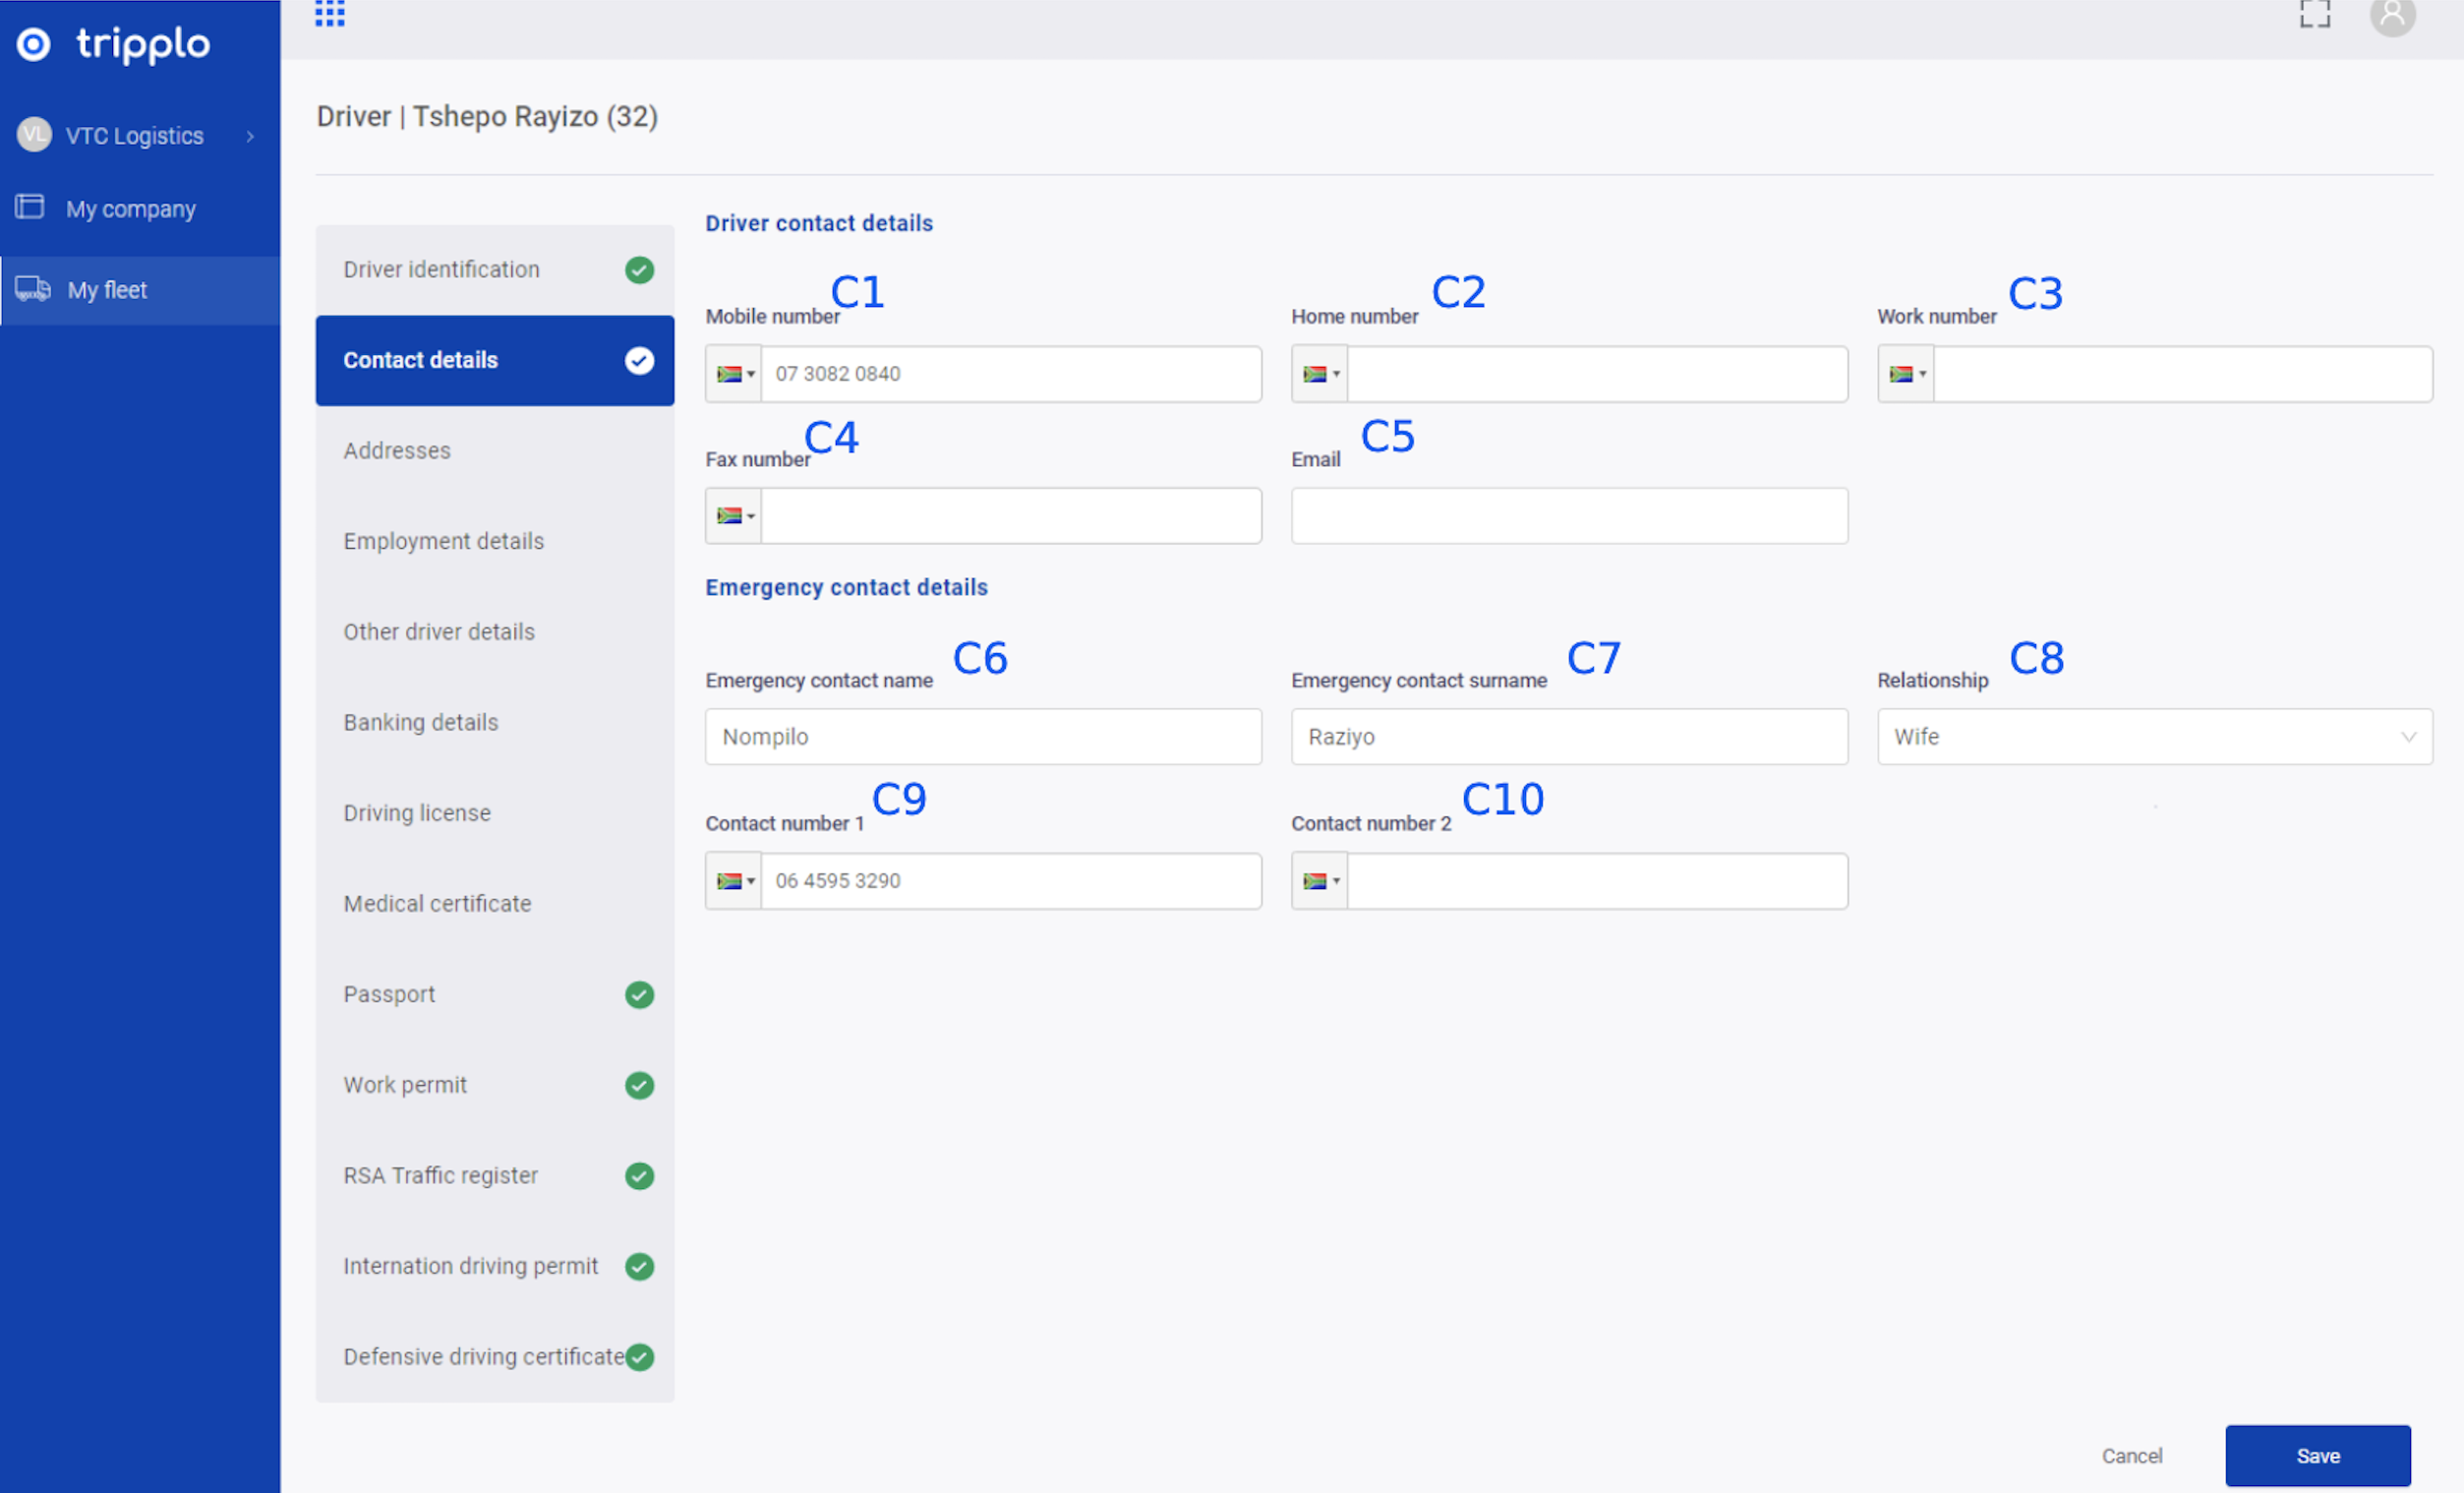
FIGURE 5:
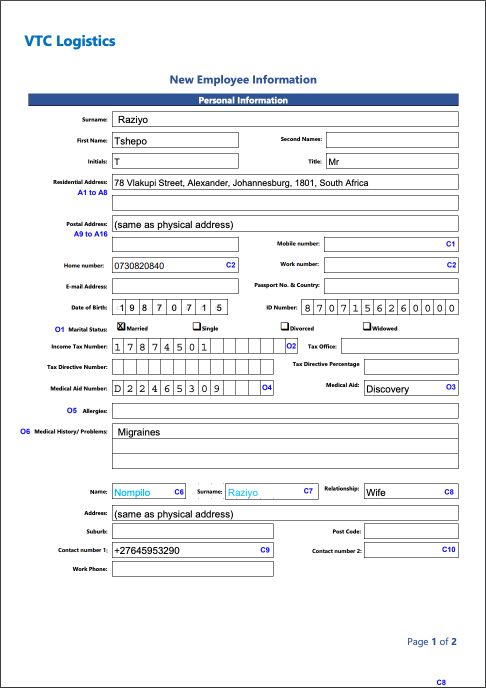
3. Addresses
Step 1: On the top right corner, click edit
Step 2: In left panel on the form, click a tab named “Addresses”.
Step 2: Follow the steps highlighted in the screenshots [Figure 6 and Figure 7] to add the required information
Step 4: Click Save
Step 5: Now you will see a list of the information added in the alerts/notification dashboard
FIGURE 6:
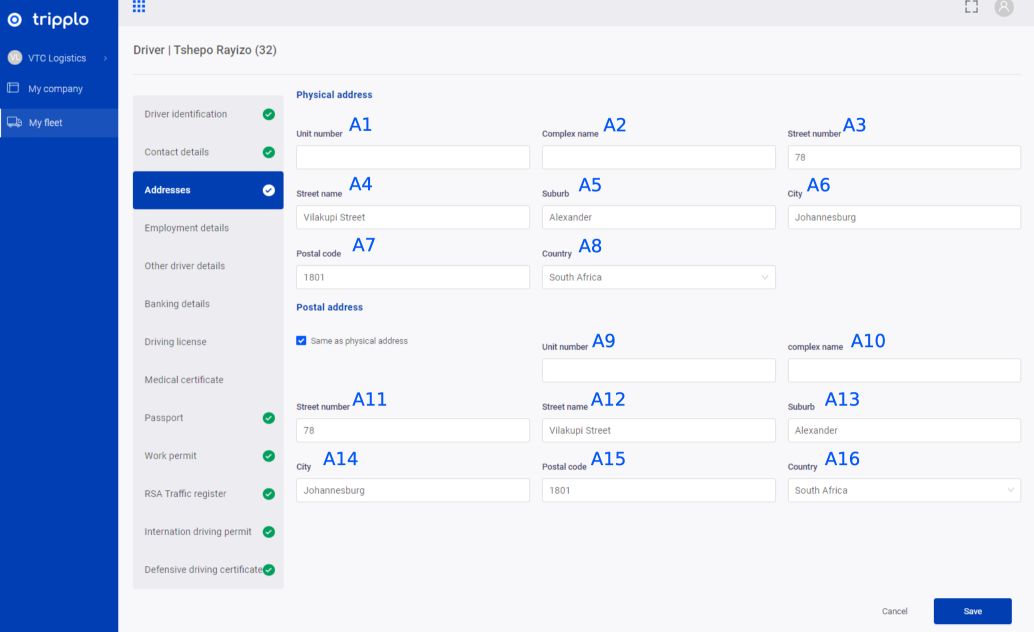
FIGURE 7:
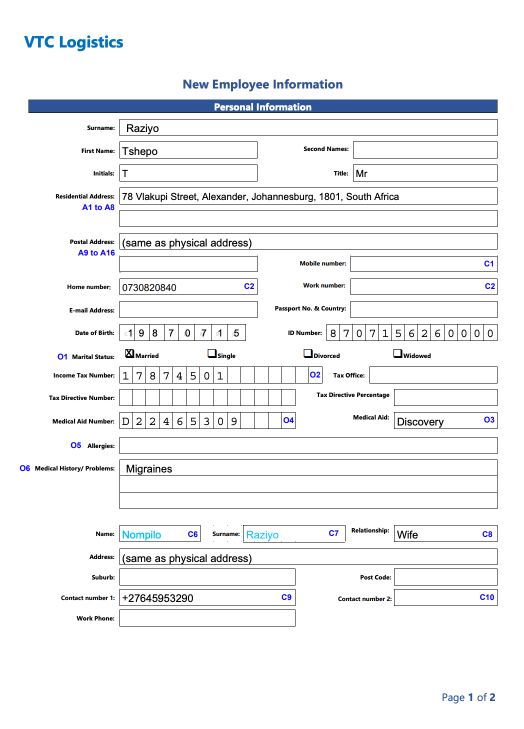
4. Employment Details
Step 1: On the top right corner, click edit
Step 2: In left panel on the form, click a tab named “Employment Information”.
Step 2: Follow the steps highlighted in the screenshots [Figure 8 and Figure 9] to add the required information
Step 4: Click Save
Step 5: Now you will see a list of the information added in the alerts/notification dashboard
FIGURE 8:
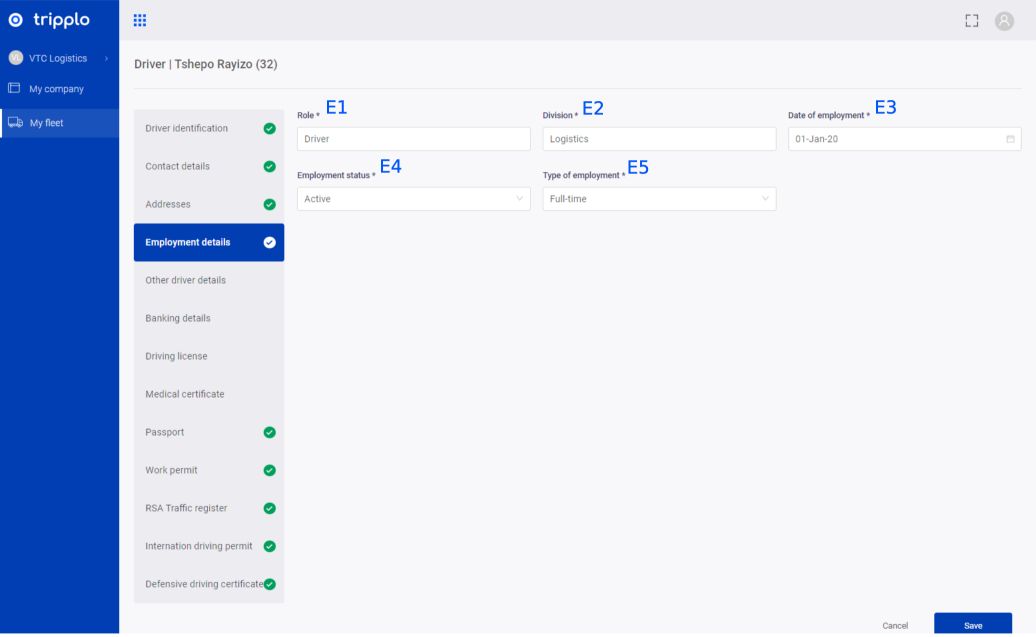
FIGURE 9:
5. Other Driver Details
Step 1: On the top right corner, click edit
Step 2: In left panel on the form, click a tab named “Other Driver Details”.
Step 2: Follow the steps highlighted in the screenshots [Figure 10 and Figure 11] to add the required information
Step 4: Click Save
Step 5: Now you will see a list of the information added in the alerts/notification dashboard
FIGURE 10:
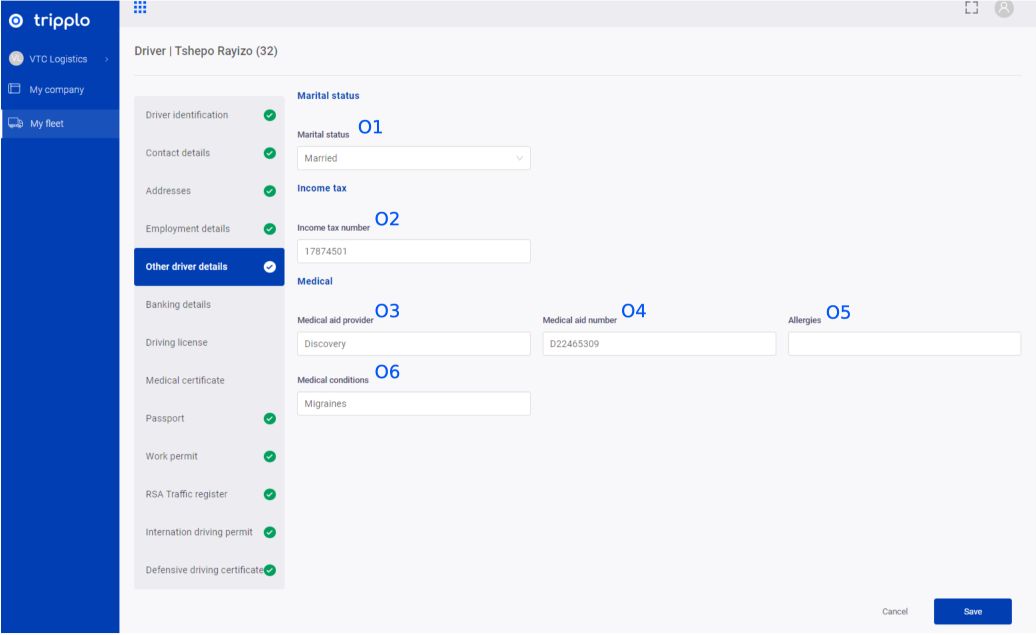
FIGURE 11:
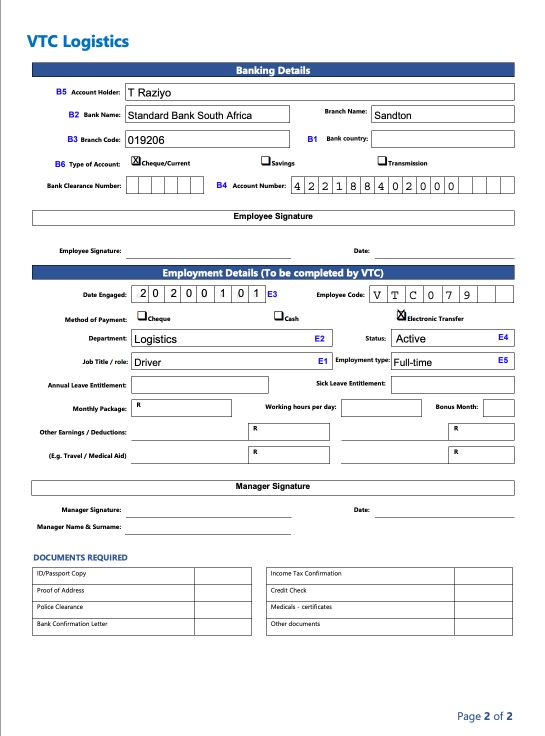
6. Banking Details
Step 1: On the top right corner, click edit
Step 2: In left panel on the form, click a tab named “Banking Details”.
Step 2: Follow the steps highlighted in the screenshots [Figure 12, Figure 13] to add the required information
Step 4: Click Save
Step 5: Now you will see a list of the information added in the alerts/notification dashboard
FUGURE 12:
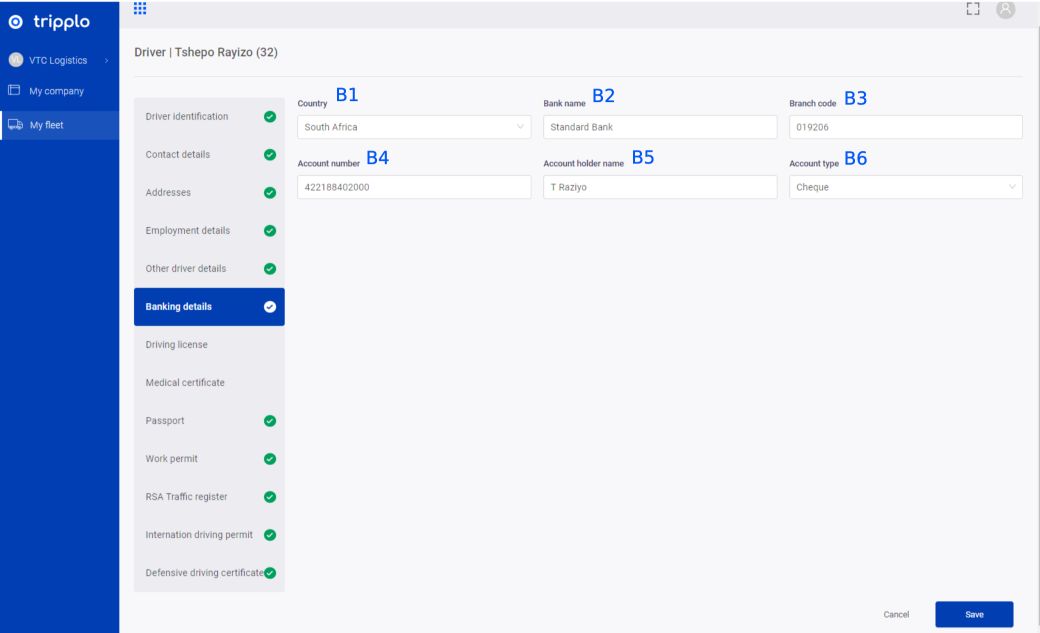
FIGURE 13:
7. Driving License
Step 1: On the top right corner, click edit
Step 2: In left panel on the form, click a tab named “Driving License”.
Step 2: Follow the steps highlighted in the screenshots [Figure 14, Figure 15 and Figure 16] to add the required information
Step 4: Click Save
Step 5: Now you will see a list of the information added in the alerts/notification dashboard
FIGURE 14:

FIGURE 15:

FIGURE 16:

8. Medical Certificate
Step 1: On the top right corner, click edit
Step 2: In left panel on the form, click a tab named “Medical Certificate”.
Step 2: Follow the steps highlighted in the screenshots [Figure 17, Figure 18] to add the required information
Step 4: Click Save
Step 5: Now you will see a list of the information added in the alerts/notification dashboard
FIGURE 17:

FIGURE 18:

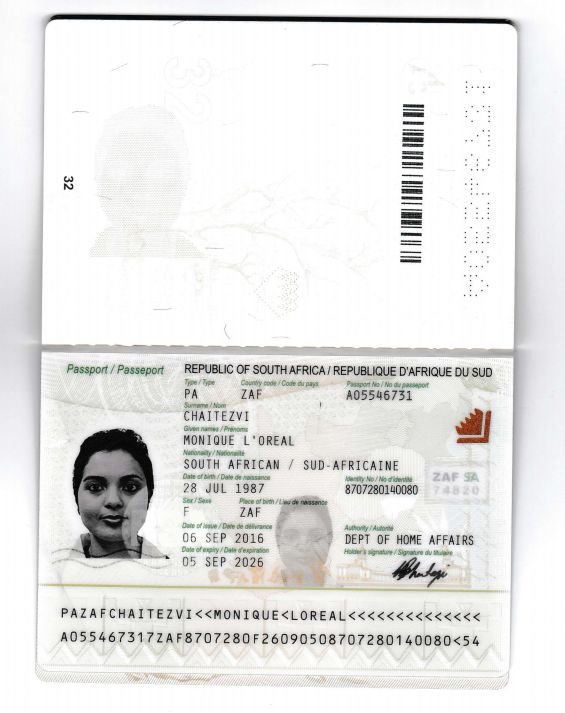
9. Passport
Step 1: On the top right corner, click edit
Step 2: In left panel on the form, click a tab named “Passport”.
Step 2: Follow the steps highlighted in the screenshots [Figure 19 and Figure 20] to add the required information
Step 4: Click Save
Step 5: Now you will see a list of the information added in the alerts/notification dashboard
FIGURE 19:
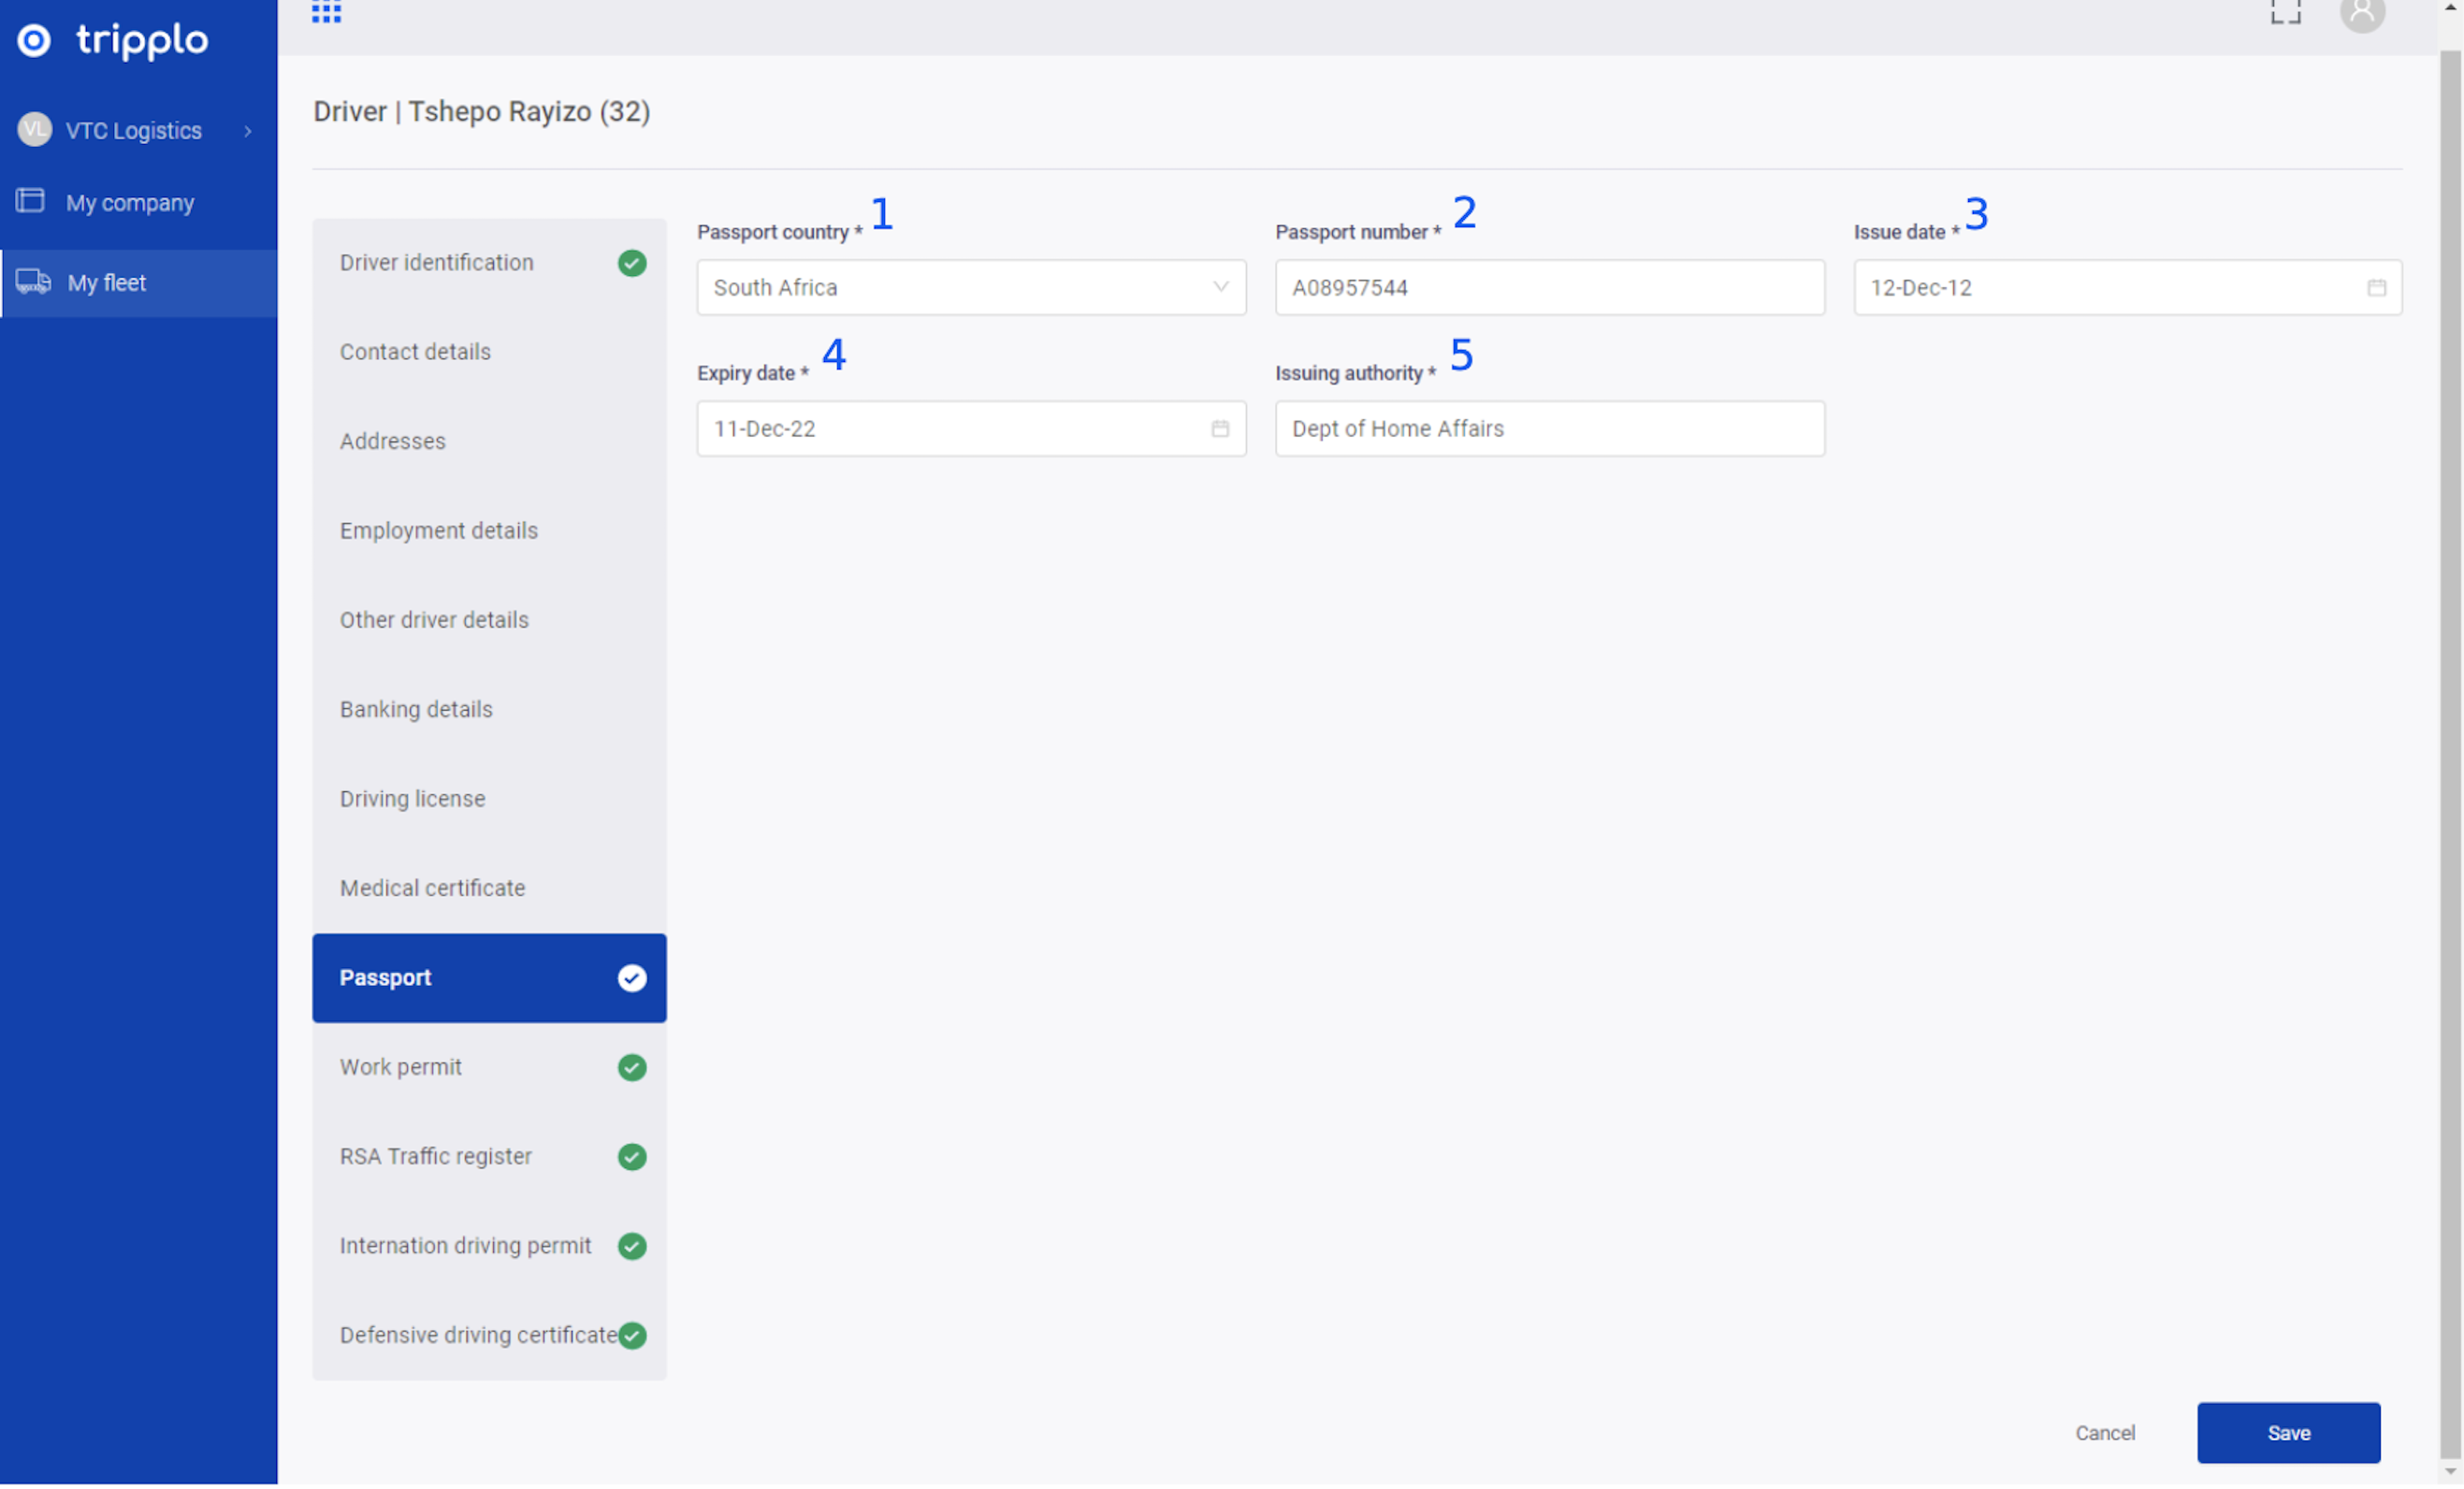
FIGURE 20:
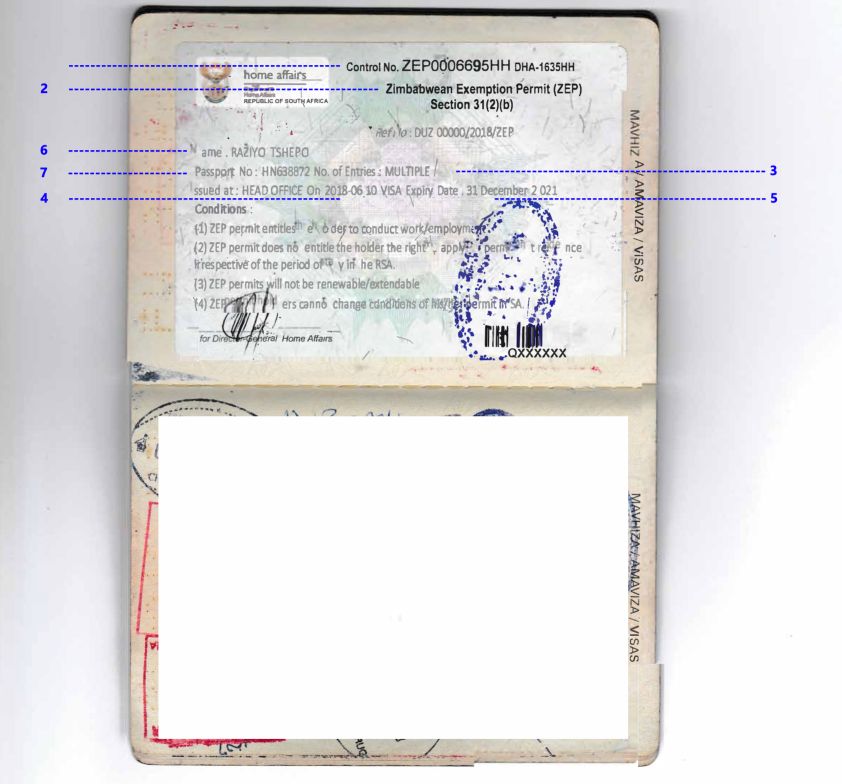
10. Work Permit
Step 1: On the top right corner, click edit
Step 2: In left panel on the form, click a tab named “Work Permit”.
Step 3: Follow the steps highlighted in the screenshots [Figure 21 and Figure 22] to add the required information
Step 4: Click Save
Step 5: Now you will see a list of the information added in the alerts/notification dashboard
FIGURE 21:
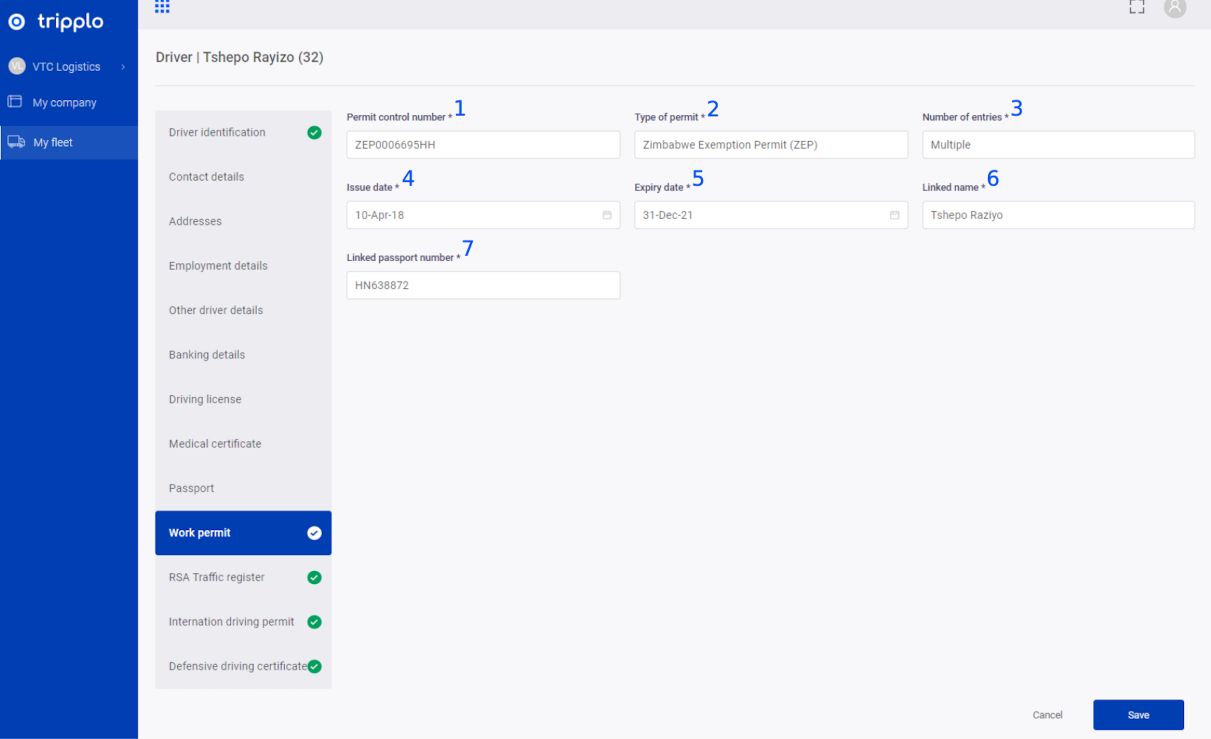
FIGURE 22:
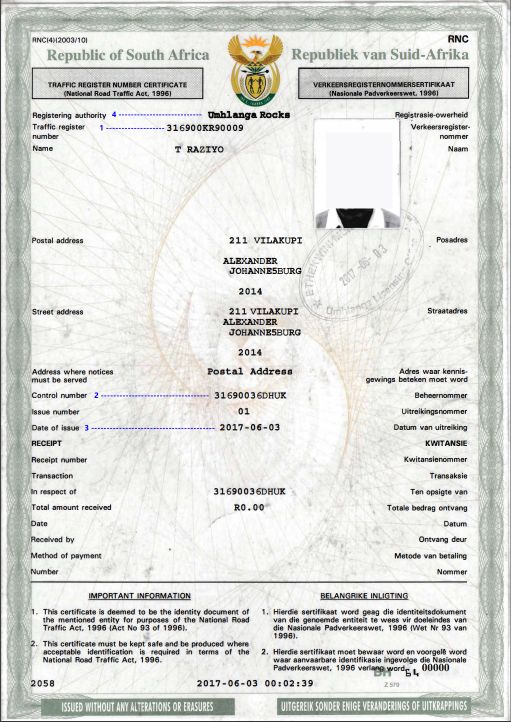
11. RSA Traffic Register
Step 1: On the top right corner, click edit
Step 2: In left panel on the form, click a tab named “RSA Traffic Register”.
Step 3: Follow the steps highlighted in the screenshots [Figure 23 and Figure 24] to add the required information
Step 4: Click Save
Step 4: Now you will see a list of the information added in the alerts/notification dashboard
FIGURE 23:
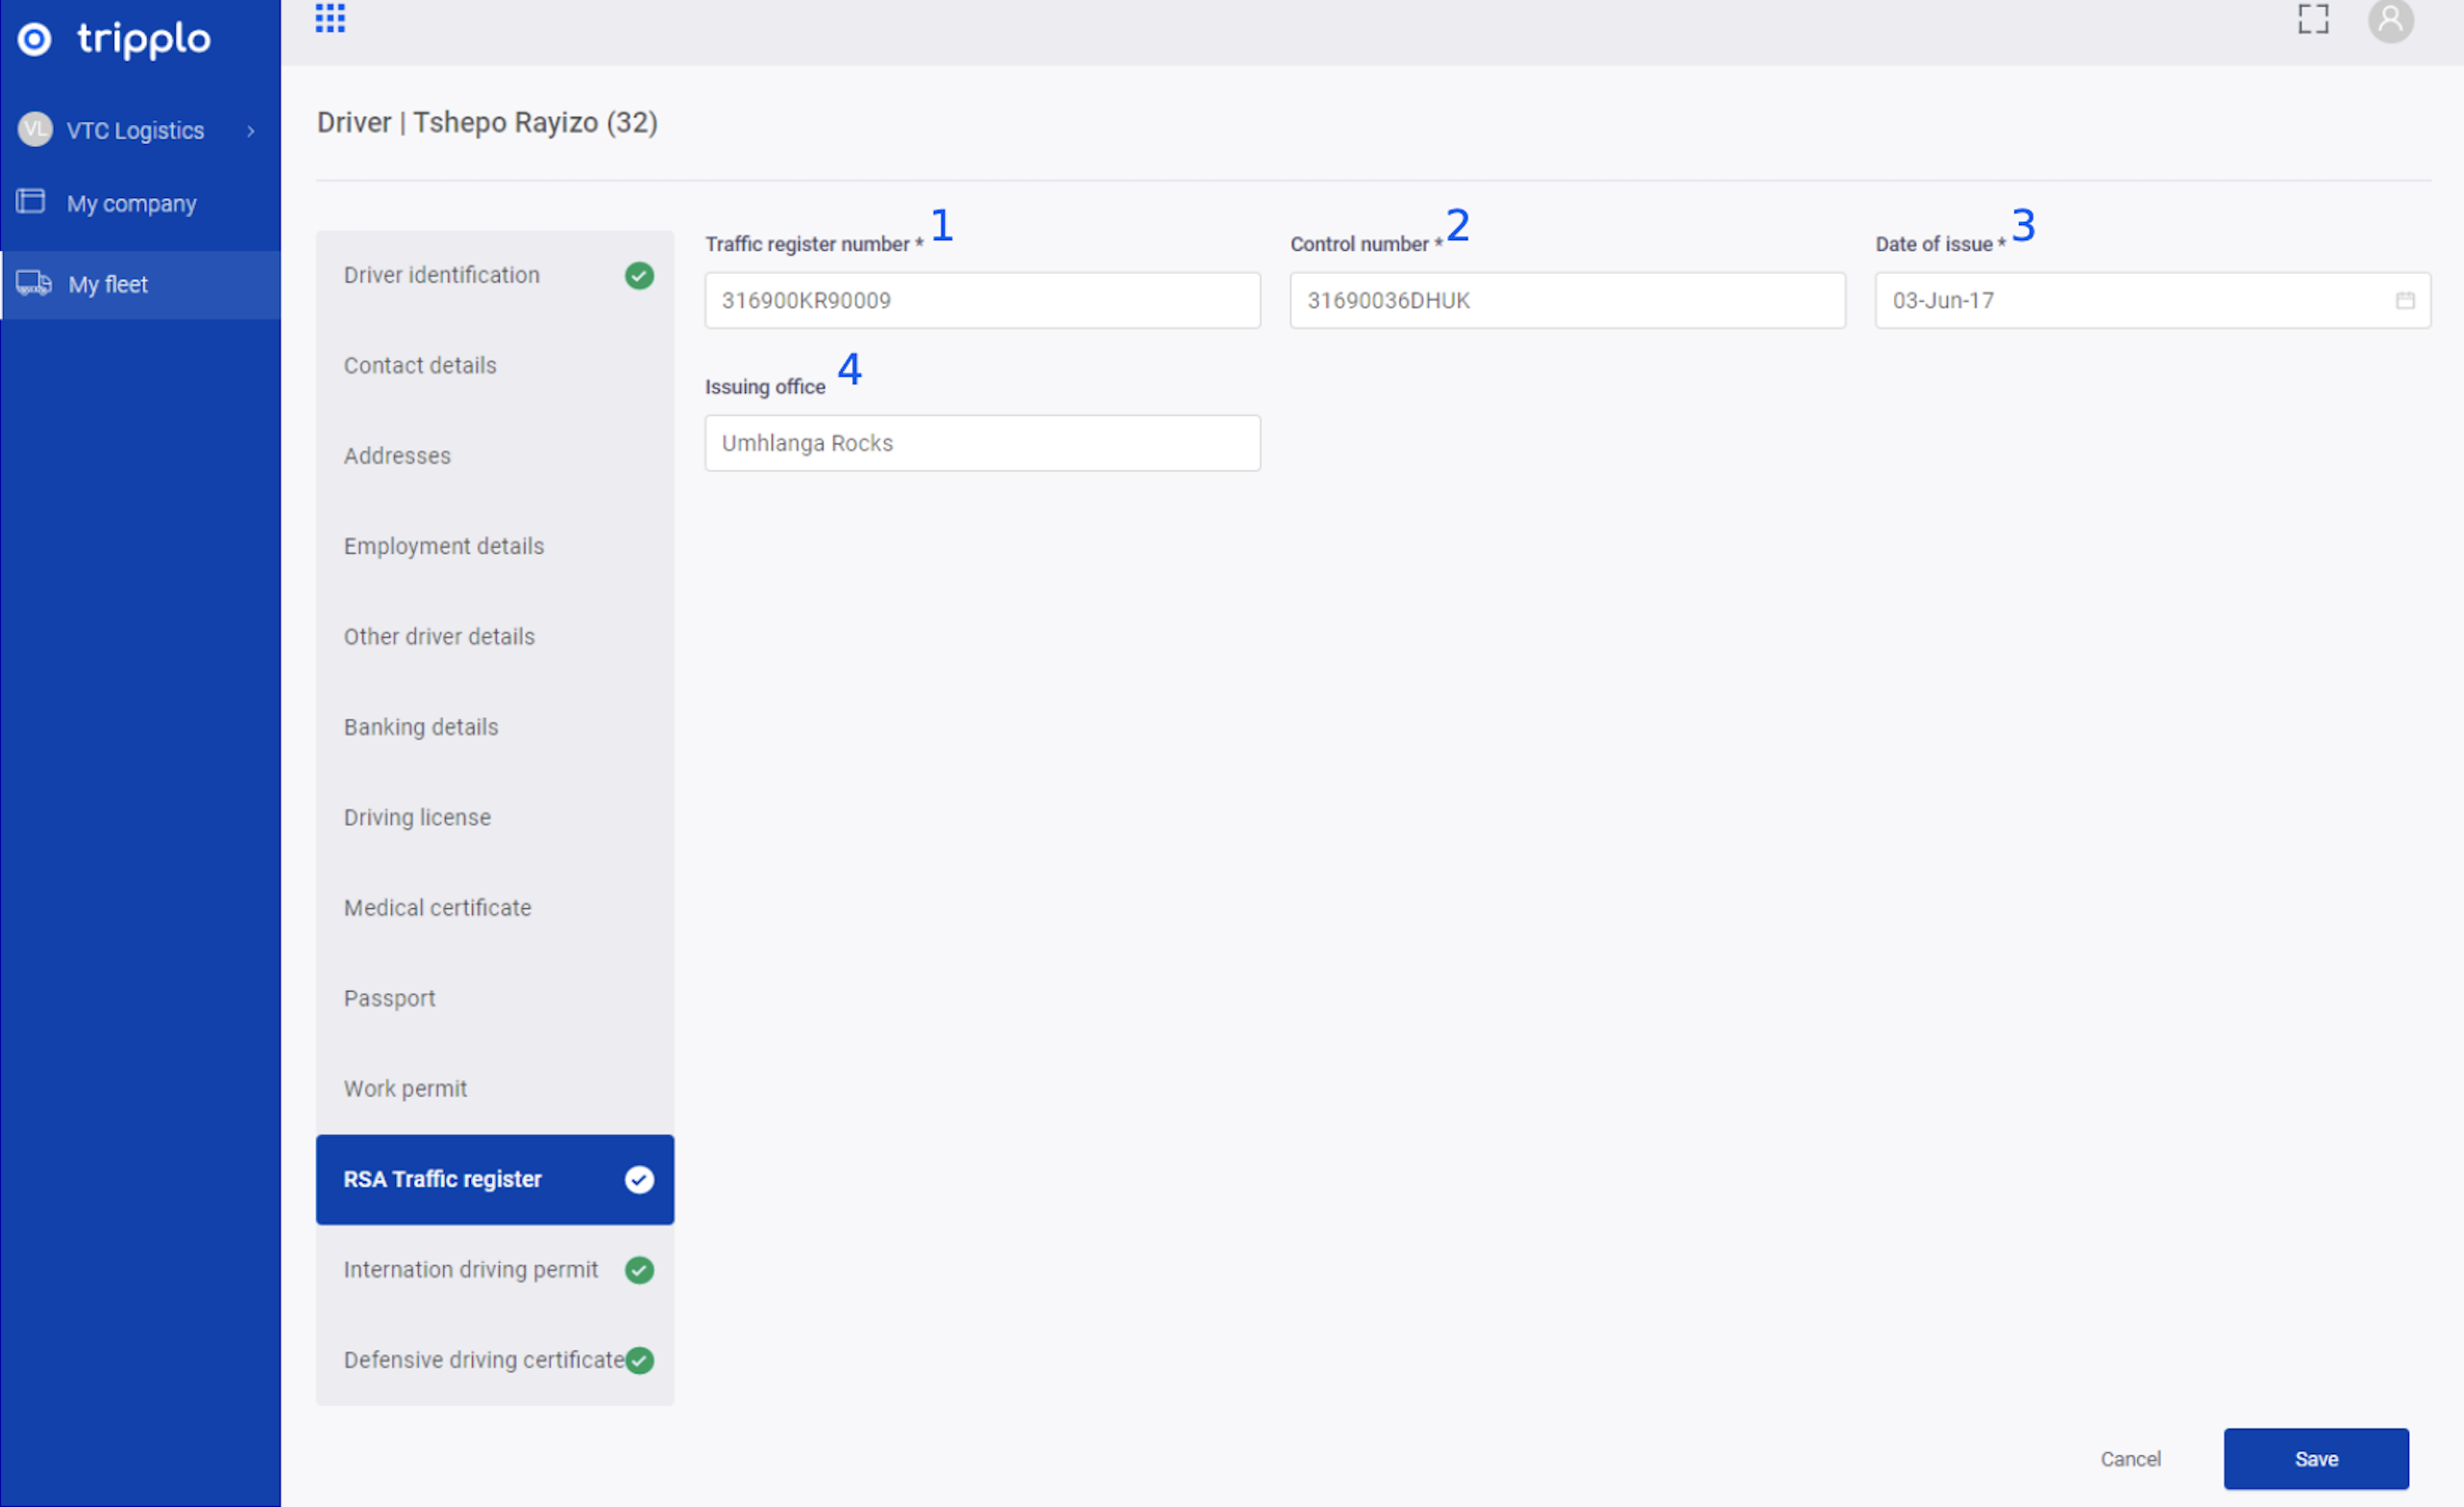
FIGURE 24:
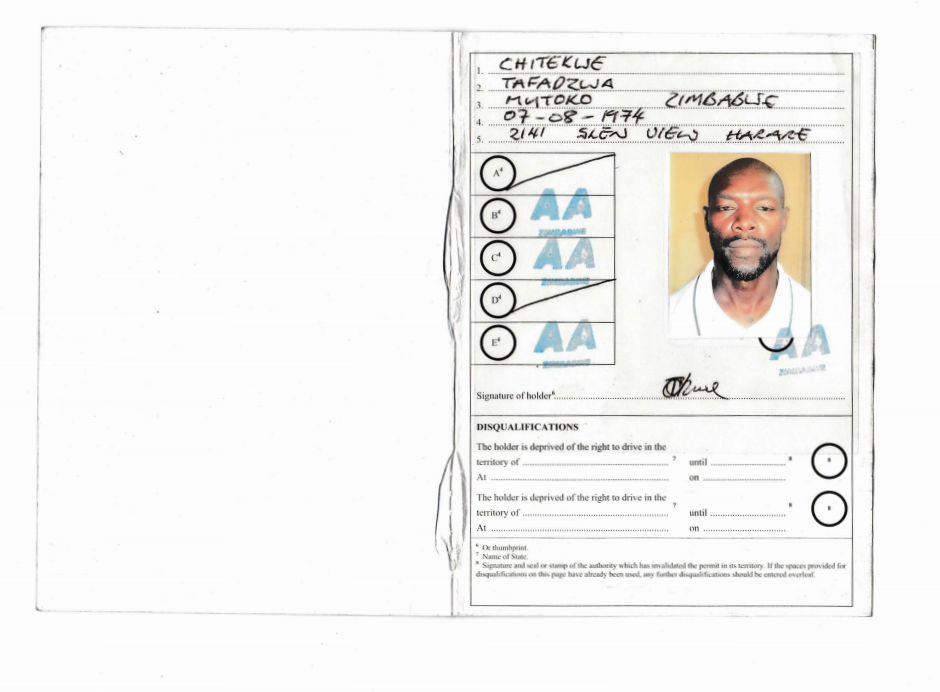
12. International Driving Permit
Step 1: On the top right corner, click edit
Step 2: In left panel on the form, click a tab named “International Driving Permit”.
Step 3: Follow the steps highlighted in the screenshots [Figure 25, Figure 26 and Figure 27] to add the required information
Step 4: Click Save
Step 5: Now you will see a list of the information added in the alerts/notification dashboard
FIGURE 25:
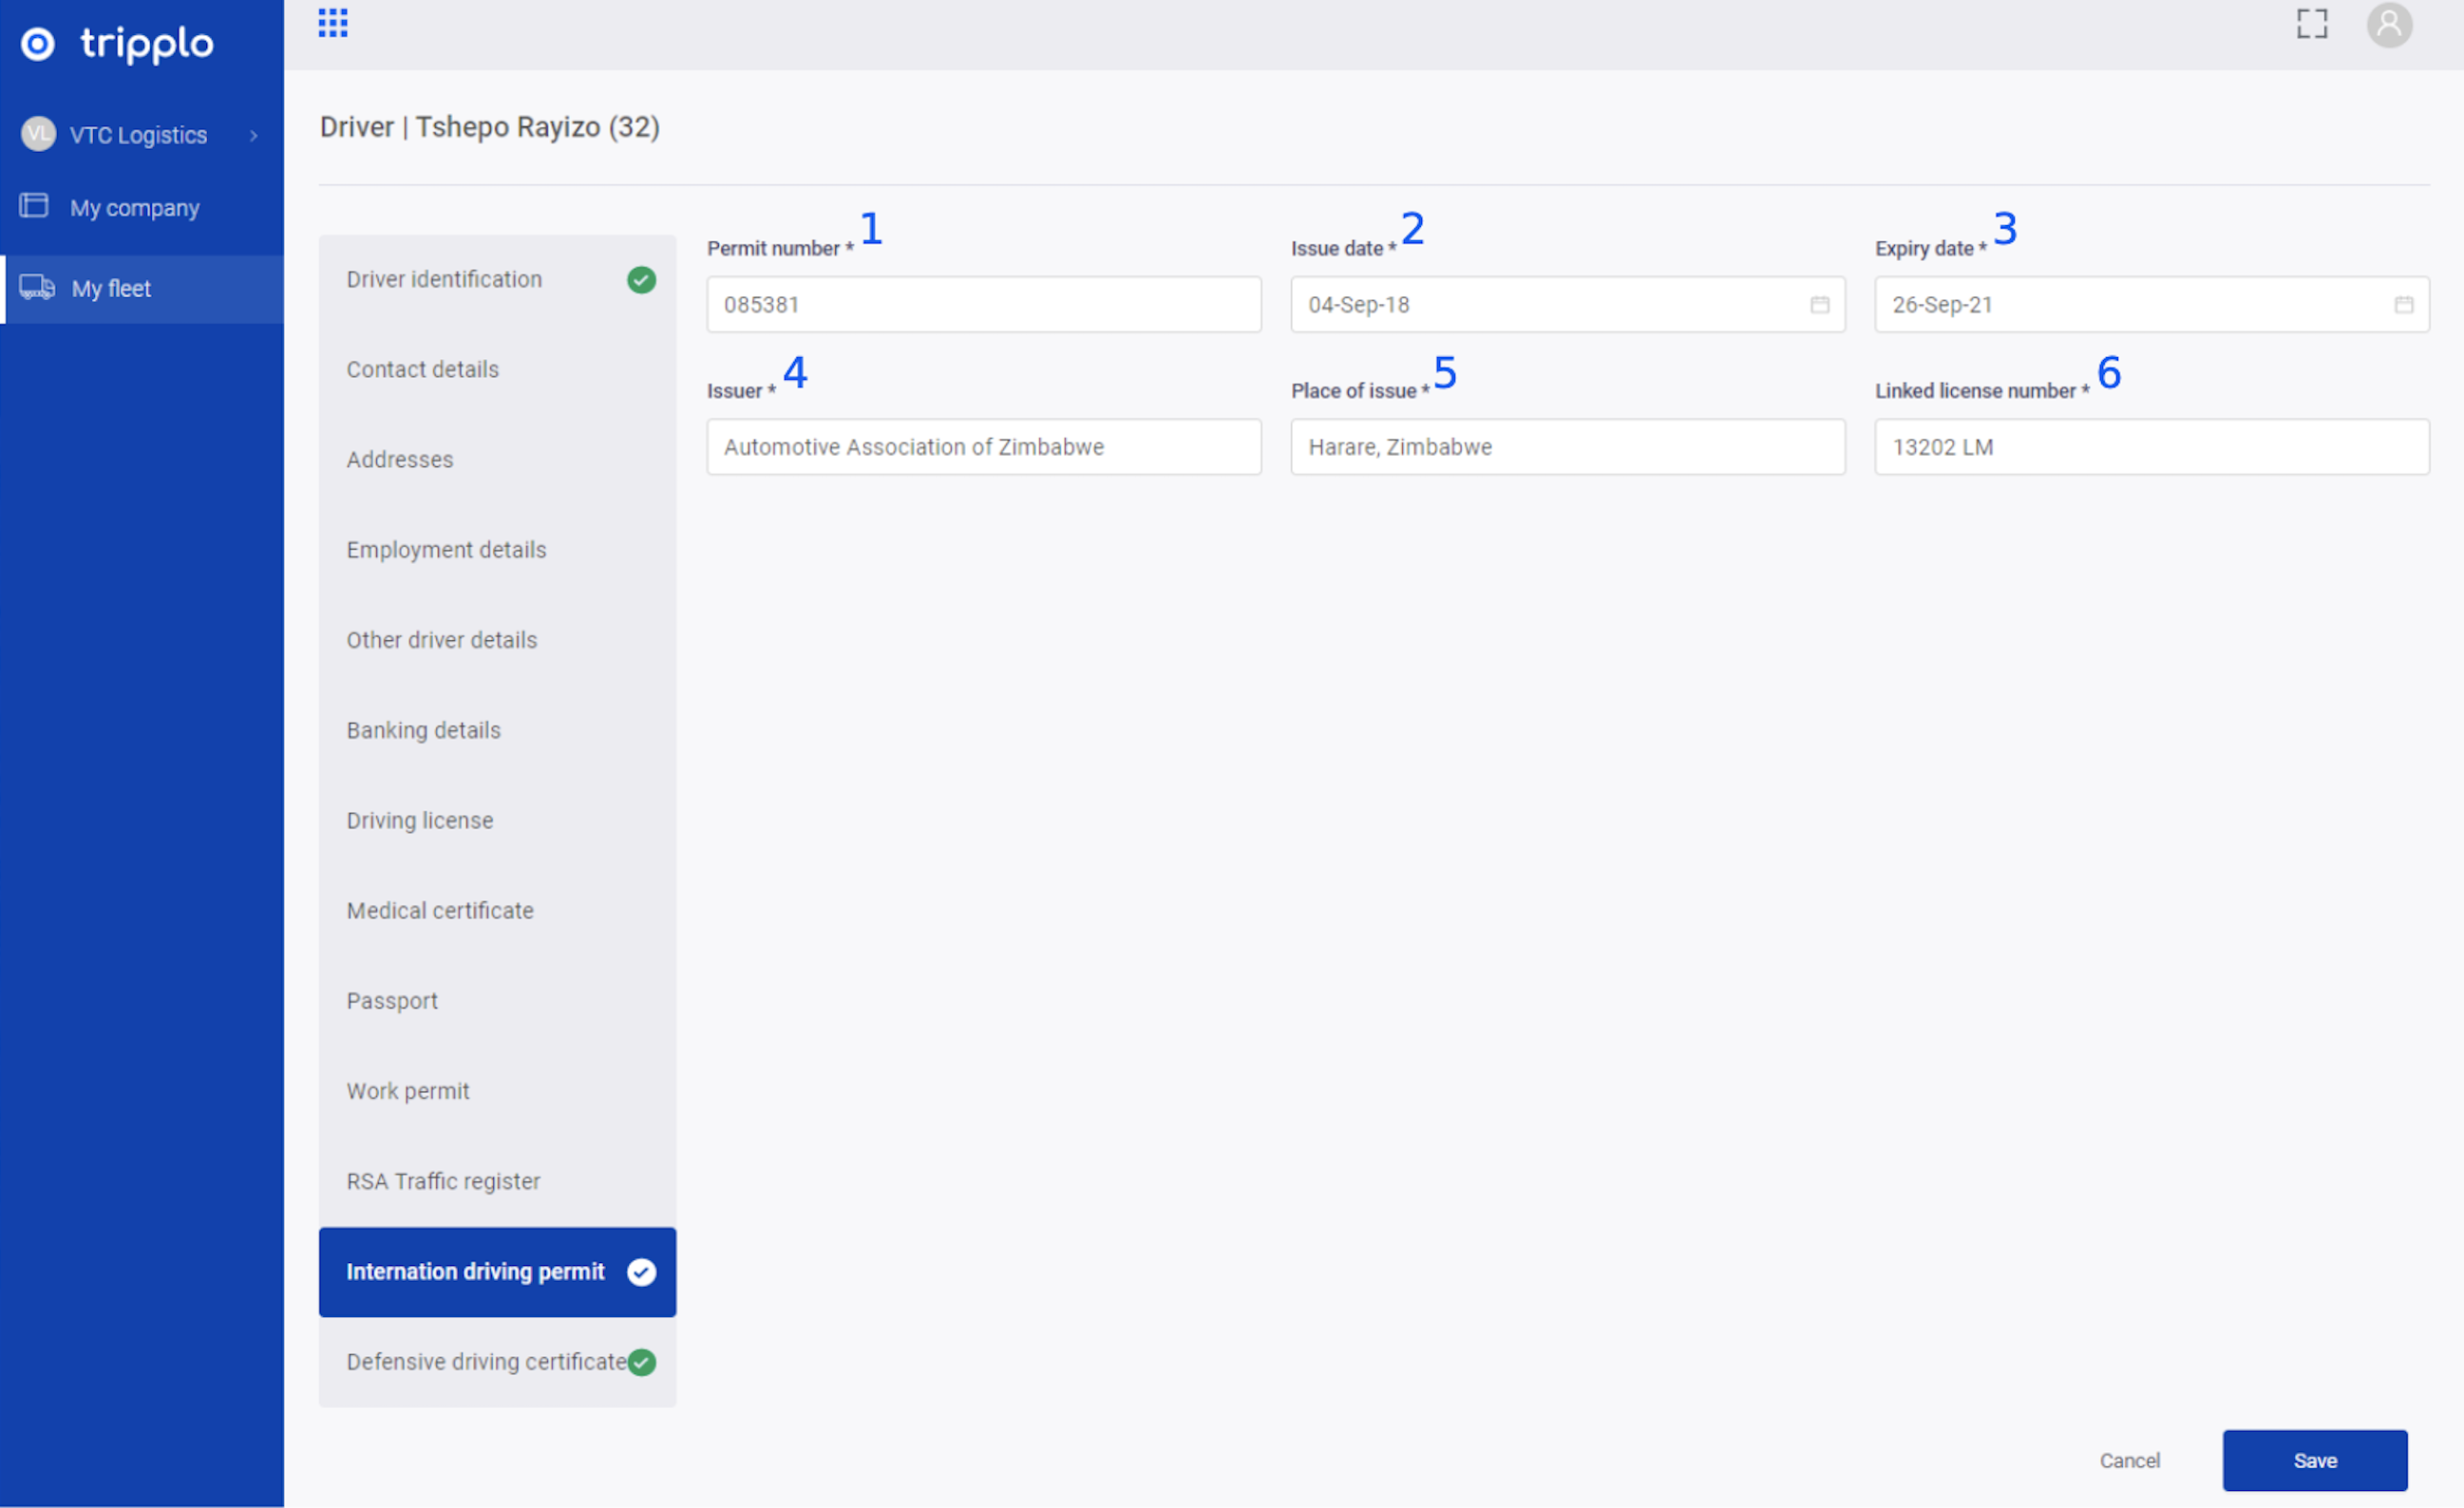
FIGURE 26:
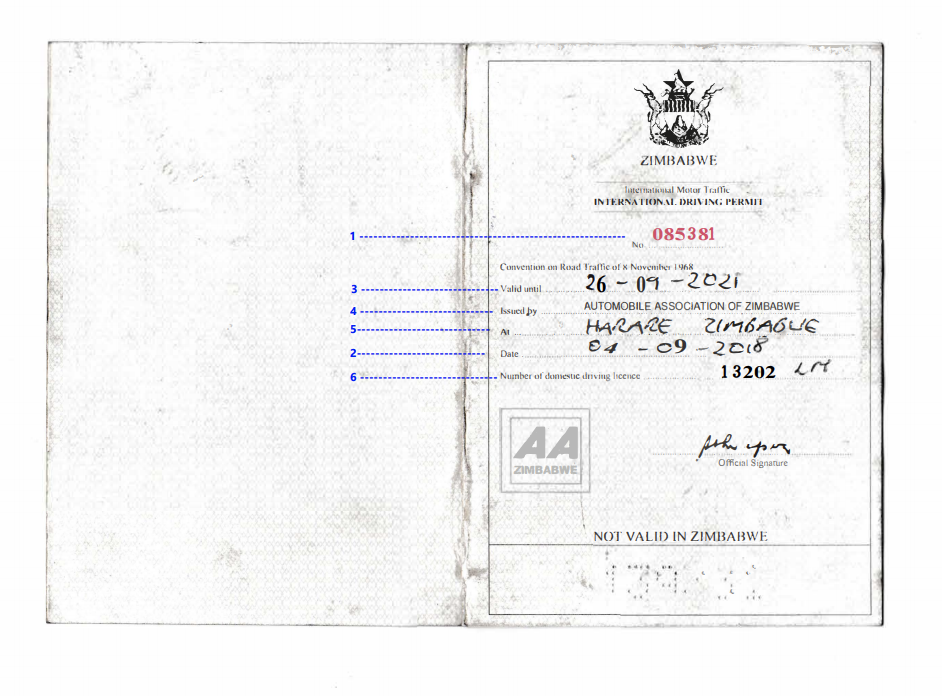
FIGURE 27:
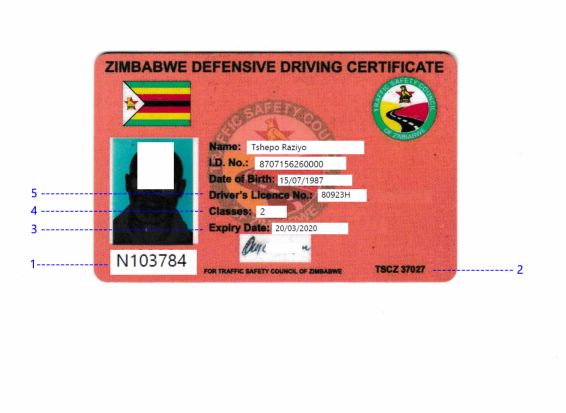
13. Defensive Driving Certificate
Step 1: On the top right corner, click edit
Step 2: In left panel on the form, click a tab named “Defensive Drivers Certificate”.
Step 3: Follow the steps highlighted in the screenshots [Figure 28 and Figure 29] to add the required information
Step 4: Click Save
Step 5: Now you will see a list of the information added in the alerts/notification dashboard
FIGURE 28:

FIGURE 29:
14. Training
Step 1: On the top right corner, click edit
Step 2: In left panel on the form, click a tab named “Training.
Step 3: Follow the steps highlighted in the screenshots [Figure 30, Figure 31 and Figure 32] to add the required information
Step 4: Click Save
Step 5: Now you will see a list of the information added in the alerts/notification dashboard
FIGURE 30:

FIGURE 31:

FIGURE 32:
